In some cases you may have a need to be able to add custom data to be shared between endpoints and message processing steps. This sample describes how to add and use custom data during file transfers.
This sample is designed to transfer XML files. While transferring files the destination directory is configured dynamically instead of using a static destination folder configured in Cobalt connection point schema.
First we create a custom message processing step which adds the custom properties to be used in dictionary which in turn can be used our custom endpoint which will be created in Step 2.
Note: It is good practice to add only a single unique dictionary entry to the CustomData dictionary for storing the data for a single purpose. This way the chance of conflicts is smaller. A conflict could occur when using custom endpoints and custom message processing steps, which all use the dictionary for different purposes.
For example, if a source endpoint would store data about files under their names in the dictionary, which a message processing step would use, and another message processing step would do the same with some other information, the dictionary entries could conflict.
    public class ContextBasedRoutingStep : MessageProcessingStepBase
    {
        public const string DynamicDirectoryKeyName = "DestinationDirectory";
        private readonly IDictionary<string, string> _directoryConfigurations = new Dictionary<string, string>();

        //implementing MessageProcessingStep requires a step to have a constructor with a single MessageProcessingStepConfig parameter
        public ContextBasedRoutingStep(MessageProcessingStepConfig config) : base(config)
        {
            XmlDocument xdoc = new XmlDocument();
            xdoc.LoadXml(config.CustomParameters);

            //select all destination directory configuration elements from parameter XML string
            var directoryConfigs = xdoc.GetElementsByTagName("directoryConfig");

            //loop through all configurations and add them to dictionary be used during execution
            foreach (XmlElement route in directoryConfigs)
            {
                string rootElementName = route.ChildNodes[0].InnerText;        //first child contains root element name
                string destinationDirectory = route.ChildNodes[1].InnerText;   //second child contains destination directory for file

                _directoryConfigurations.Add(rootElementName, destinationDirectory);
            }
        }

        public override FileInfo Execute(FileInfo inputFile, ExtendedTransferContext context)
        {
            try
            {
                //if key already exists, a destination directory for previous file transfer is stored in dictionary
                //remove the previous value before proceeding
                if (context.CustomData.ContainsKey(DynamicDirectoryKeyName))
                    context.CustomData.Remove(DynamicDirectoryKeyName);

                //load XML file
                var xdoc = new XmlDocument();
                xdoc.Load(inputFile.FullName);

                string xmlRootElement = xdoc.DocumentElement.Name;
                //is the XML documents root element found in dictionary created by constructor
                //if so, set the destination directory accordingly
                if (_directoryConfigurations.ContainsKey(xmlRootElement))
                    context.CustomData.Add(DynamicDirectoryKeyName, _directoryConfigurations[xmlRootElement]);
            }
            catch (Exception ex)
            {
                Trace.WriteLine(String.Format("Error occurred while parsing XML file, file will be transferred to the default destination folder. Exception details: {0}", ex));
            }

            return inputFile;
        }

        public void Dispose()
        {
            Trace.WriteLine("Disposing ContextBasedRoutingStep");
        }
    }
Message processing step receives an XML structure as its constructor parameter which contains details on how different XML files are handled, i.e to which directory they will be transferred. Consider the following XML parameter structure:
<destinationConfig xmlns="">
    <directoryConfig>
        <rootElementName>invoice</rootElementName>
        <destination>C:\XML\Invoices</destination>
    </directoryConfig>
    <directoryConfig>
        <rootElementName>order</rootElementName>
        <destination>C:\XML\Orders</destination>
    </directoryConfig>
</destinationConfig>
Structure instructs that if XML document's root element is invoice
the file is transferred to C:\XML\Invoices directory. If the document's
root element is order the file is transferred to C:\XML\Orders
directory.
Parameters could contain any number of directoryConfig elements.
That adds more dynamics to the Cobalt routine executions as new directives on where
to send XML files, based on their root element name, could be easily added simply
by adding new directoryConfig elements to the Cobalt connection point
configuration.
During file transfer execution the transferred XML file is parsed in order to check
the whether the root element is order or invoice and set
the destination directory accordingly. If error occurs during parsing the XML file,
the destination directory is not set and the file will be transferred to the default
destination folder (Cobalt connection point schema's destination endpoint's Directory
parameter).
Because ContextBasedRoutingStep implements IMessageProcessingStep
we have to implement the Dispose method as well, even though there are
no resources to free etc. Ín this case we just log a message of disposing the
MessageProcessingStep.
Next, we need to create an endpoint for using the custom data added by our message processing step. This section shows only the operations which are needed to perform in order to get this sample to work. For more in depth view of extending an endpoint, see: Extension HowTo - Extend Existing Endpoint or Endpoint from scratch HowTo - Creating a new endpoint.
    public class ContextBasedRoutingFileEndPoint : FileEndPoint
    {
        private readonly IDictionary<string, object> _customData;

        public ContextBasedRoutingFileEndPoint(TransferEndPointConfig endPointConfig, IDictionary<string, object> customData) : base(endPointConfig)
        {
            _customData = customData;
        }

        //override Put to transfer the file to dynamically configured destination folder
        public override void Put(string sourceFile, string remoteFile)
        {
            //if custom destination folder has been defined, set 'remoteFile' i.e. where the file will be copied to, to point to new  directory
            if (_customData.ContainsKey(ContextBasedRoutingStep.DynamicDirectoryKeyName))
            {
                string directory = (string)_customData[ContextBasedRoutingStep.DynamicDirectoryKeyName];
                remoteFile = Path.Combine(directory, remoteFile);
            }

            base.Put(sourceFile, remoteFile);
        }

        //override Rename in order to be able to rename the destination file in correct directory
        public override string Rename(string remoteFile, string to)
        {
            //if custom destination folder has been defined, set 'remoteFile' and 'to' to point to new  directory
            //in order to be able to perform renaming
            if (_customData.ContainsKey(ContextBasedRoutingStep.DynamicDirectoryKeyName))
            {
                string directory = (string)_customData[ContextBasedRoutingStep.DynamicDirectoryKeyName];
                remoteFile = Path.Combine(directory, Path.GetFileName(remoteFile));
                to = Path.Combine(directory, to);
            }

            return base.Rename(remoteFile, to);
        }
    }
In this sample we use FileEndpoint as our base class. We need to override Put
method as otherwise the file would be transferred to the default destination folder
configured in Cobalt connection point schema. First we need to check has the DestinationDirectory
been defined, i.e. is the key found in the CustomData dictionary. If
the destination directory has been set, set the destination folder to point to that
new direction, otherwise transfer the file normally to the default destination directory.
Because the CustomData dictionary is of type <string,object>
we need to cast the value to string.
Because Cobalt transfers file with a temporary file name (unless otherwise configured,
see Cobalt general parameters for
more details) we need to override the Rename method as well. As with
the Put method we also need to check is the DestinationDirectory
defined. If it is defined we need to set the rename operation to point to that new
directory instead of the default destination directory.
In order to use the code with Cobalt you first need to compile it to an assembly and deploy the assembly somewhere FRENDS Iron can find the code. This means either the \Program Files\Frends Technology\FRENDS Iron -directory or the GAC
Once the assembly is deployed, you need to configure Cobalt to use the new custom EndPoint and MessageProcessing step. To do this, just create a new Cobalt connection point as described in the manual and:
Destination endpoint type to CustomCustom element:
AssemblyName to the assembly name where the custom class resides
in, e.g. Frends.Cobalt.Extensions, Version=1.0.0.0, Culture=neutral, PublicKeyToken=null.ClassName to class name of custom class, e.g.Frends.Cobalt.Extensions.ContextBasedRoutingFileEndPoint.Parameters empty, as our custom endpoint does not need any
parameters.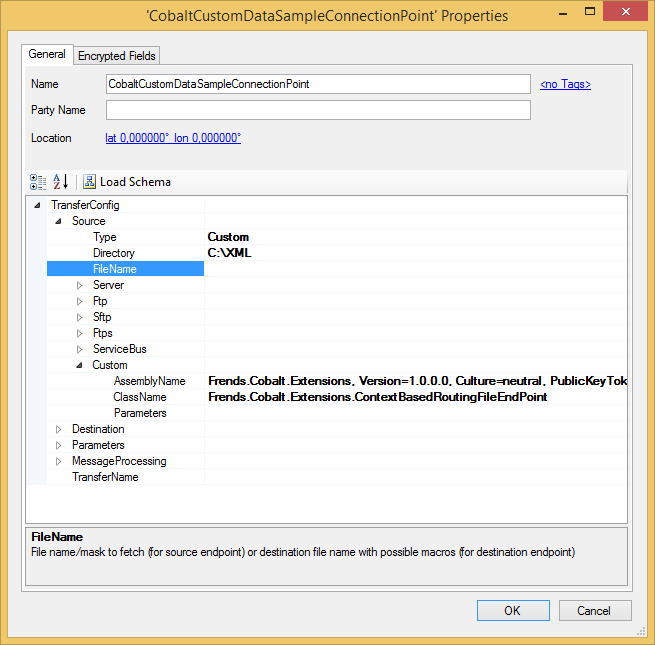
Next, set the file transfer to use the MessageProcessingStep we created:
MessageProcessing and set the first Step type to
Custom.Custom element:
AssemblyName to the assembly name where the custom class resides
in, e.g. Frends.Cobalt.Extensions, Version=1.0.0.0, Culture=neutral, PublicKeyToken=null.ClassName to class name of custom class, e.g.Frends.Cobalt.Extensions.ContextBasedRoutingStep.Parameters to <destinationConfig xmlns=""><directoryConfig><rootElementName>invoice</rootElementName><destination>C:\XML\Invoices</destination></directoryConfig><directoryConfig><rootElementName>order</rootElementName><destination>C:\XML\Orders</destination></directoryConfig></destinationConfig>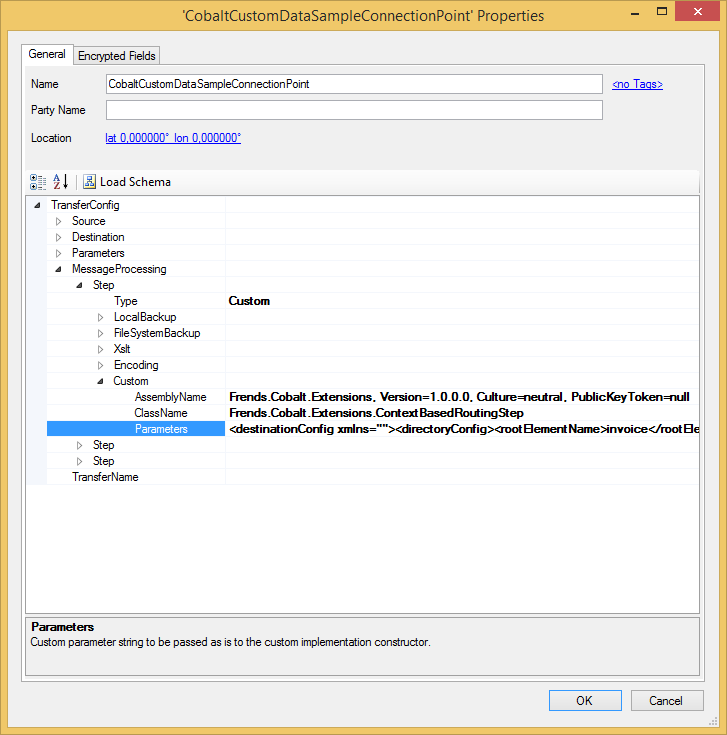
For this sample, create 2 XML files in your Cobalt input directory. Create file with a name of 'order.xml' and with the following contents:
<?xml version="1.0"?>
<order>
    <customer>Global Corporation In</customer>
    <address>Central Avenue 5</address>
    <item>General big item</item>
    <price>50000.00</price>
</order>
Create a second file with a name of 'invoice.xml' and with the following contents:
<?xml version="1.0"?>
<invoice>
    <customer>Acme Inc</customer>
    <address>Hill Street 3</address>
    <sum>8650.00</sum>
</invoice>
Also create the directories:
As in the manual create and execute file transfer routine.
Examine the C:\XML\Orders and C:\XML\Invoices directories.
You should have one file transferred to each folder, based on the root element of
the XML file.